Showing posts with label Aurora. Show all posts

Friday, June 21, 2013

The Parkettes of Richmond Hill: A Summer Odyssey


I've lived here for two years now. I keep trying to settle in. 
I've decided to really take the time to explore what my surroundings actually hold. 
I gathered a bunch of town literature from community centres nearby..
trail and park guide

One thing I picked up was a fold out map called A Guide to Parks & Trails in Richmond Hill.
three houses down from me

What really got me onto the park system here was this little thing down the street  from where I live:

What is that anyway?
Is this what they call a park? Who patrols it?
This is what I would call "a shortcut" but it's something "official" with those rules on the sign telling us how to use this space. Wow.  It's marked on the map with a faint sage green line, and no number so it's not an officially named space. 
So there are some quirks. 
Besides the official unofficial shortcut, Richmond Hill has kettle lakes, rivers, trails, parks and parkettes. 
Some parkettes are right beside parks. 
So what's the difference? 
There are 34 parkettes according to this map and this summer I am going to visit them all and report back.  


crow earrings

Right now I am getting my art together for the Aurora Farmers' Market in the morning...
flying pigs by request-verson #1

version #2
We can talk after.

Monday, December 10, 2012

Machell's Commons - Public Art on a Private Fence: Pt 2

I've been telling you about the fence project that I was commissioned to create based on the concept given to me by my client Klaus.

(follow this link for the previous fence-related post public-artwork-on-private-fence-pt-1.html )

Klaus' letter to the editor concerning the fence was published this week in the Dec. 4th issue of The Auroran, the local paper..
 A local high school student, Laurel Cook,  decided to make a 10min documentary for her film class about the fence as well. I was interviewed in my studio last week for it. Her due date is Dec 17th so I hope to see the results soon.

The project began in May 2012 and we installed the completed figures on November 13th, 2012. It was very cold. We even had a few snowflakes and then a bit of rain, but we were anxious to complete the project.

To briefly recap, I drew characters for the fence, creating life-size templates for them out of paper which Klaus took and used as his guide to cut the shapes out of wood. Once cut, with the edges sanded, they came back to me for priming on  both sides and then painting into their final colour. In addition I had washers to paint in rustproofing primer, two sides, and the heads of bolts to paint to match the characters so when they were inserted into their body they would not be visible. As an added visual treat, Klaus requested I paint about 30 washers in a bright colour so when he saw the fence from the house he'd see bright dots on his fence since the whole installation is not on the interior of the fence but on the exterior, overlooking a local public park and tennis club.

getting ready to install the characters on the fence
all present and accounted for
To install we drilled strategically placed holes (never in the face/head!)
hole in arm ok

who could drill into this face?!
Klaus then went inside the fence, to his property, while I stayed on the outside facing the public space. I inserted the matching bolt, added a rustproofed washer and then we fed the bolt though the fence slats where Klaus had a brightly painted washer to thread onto the bolt and then he added a nut and tightened the whole thing up.

Klaus did this freehand drilling that freaked me out a bit

but it looked like he'd done this kind of thing a lot, so I stopped worrying

It took a few hours, especially as people stopped by to talk to us about what we were doing. Most times I made them work a bit too: holding things up so I could step back to see the composition

as well as helping me pass tools back and forth to Klaus over the fence.
Klaus and his trusty wrench

Slowly it came together until it was finished. Three animals weren't included in the final layout this time round: the earthworm, the snail and the porcupine. We plan to change it up in the spring.

Once done, I headed to the backside of the installation and touched up the backs of the animals that peeped over the fence. Several figures are double-sided so Klaus and his wife can enjoy them from their windows.

back of chorusline birds
painted washers
 As well, his idea to paint the washers was brilliant! I LOVE the coloured dots here and there. I think there is a future art project to be done with the washers only.

What is missing are the two thought bubbles and the one word bubble. In time, these characters will be expressing themselves. Klaus is considering what he wants to say/what they could say.

For now, he is content to have only the name of the piece there. It is called Machell's Commons. This is a take of the original name for the town of Aurora, where this artwork lives. It was called Machell's Corner. The fence depicts a gathering area, or commons, when there was not as much development and more wildlife. The joy of spaces and the joy of nature. When the natural environment was more stimulating and interesting.
Machell's Commons  20' x 6' fence with painted wood figures
with Klaus Wehrenberg and Katie Argyle


Friday, December 07, 2012

Public Artwork on a Private Fence: Pt 1

 
One of the most elaborate projects I've worked on happened for me this year.

Machell's Commons  painted wood animals installed on a 20' stretch of private fence, facing a public park (with owner Klaus)

This project started in May and we wrapped it up mid-November. If you've ever doubted the power of showing your work as an artist at a farmers' market, well, without me doing that I would never have had the opportunity to work with Klaus Wehrenberg and to help bring his vision of creating some visual interest in an otherwise bland suburban environment. It was a delight for me all year long to hear his views on art and stimulating environments vs. what we have by default as there is precious little attention being given to this kind of stuff in our communities. Nevermind! We were out to do a little something about it.


At the back of Klaus' property is this fence. Here it is as it existed in May. This was our canvas.


Klaus showed me that he had already made a few artistic interventions by adding these mushroom shapes to the tops of the fenceposts, but he wanted more.

When I met Klaus in the market for the first time, he told me he had been searching for the right artist, one who could "do funny animals".
"Oh, I can do funny animals", I said.
In addition he was looking for an artist comfortable with colour.
Again, that works for me.

His concept was already well thought out. He really needed someone to help bring it into the world. After some discussion over what animals he would like to depict on the fence I did some preliminary drawings. Usually I just do a pencil sketch, but he needed full colour.


Once we were agreed, the next step was for me to make the paper templates in the true size of the finished character. I had 19 animals to create on paper. Klaus would then take my templates and cut them out of wood.

Here are some of the templates


Fast forward to late August. Here is the pile of wood critters ready to be primed before they can be painted. I have to say that when Klaus handed me the wooden figures the edges were superb. Turns out he's a woodworker with an expert touch. The edges were a thing of beauty, but functionally they were rounded to help facilitate the shedding of the rain (snow and ice) off all the surfaces.
 This project required that the wood be sealed as best we could since it is an outdoor installation. In addtion, one side of the wood was primed grey, one side white and all the washers and the heads of the bolts were also primed to protect from the weather. The UV rays are another kettle of fish. At least if things fade they will fade in unison.

Here are the rabbits before

and after being primed
Here's the back of the beaver showing  the primed washers too.

To be continued...

Thursday, March 08, 2012

Hillary House 150th Anniversary Exhibit

While in Key West I came across the call for submissions to the 150th Anniversary Art at the Manor exhibit in Aurora.


Aurora is about 20 minutes north of where I live. The Manor is the only official historical site in Aurora with a history of medical doctors occupying the site. They lived and worked there. The house is full of artefacts, documents and paraphrenalia. As a participating artist I will be allowed to spend some time with the obects that interest me in order to create a few prints expressing my own interpretaion of the site.

I'm really intrigued by this project.

More information on Hillary House can be found here

The images below are from their website. Soon I'll see them, and more, in person.


family momentos

fireplace


for medicinal purposes


Hillary House, Aurora, Ontario

Wednesday, July 06, 2011

Aurora Jazz and Art Festival - - July 29 - 31, 2011

I am going to be showing my art at the Aurora Jazz Festival July 29th to the 31st. I am also one of the artists who will be creating a painting on site. I have two hours to paint something which will then be auctioned off in the evening in the Silent Auction Art Tent.

With such a strict time limit I thought I would practice and see if I can actually do this. Since I am readying myself for a string of art shows over the next two months (how did that happen??) I need to paint like a fiend anyway. When I moved I *gasp* happily destroyed a lot of my work since I have no space here to store it all. I also wanted to start fresh.

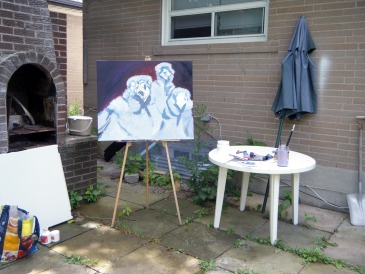
So today is my first try at a 2 hour acrylic painting. I am going to work outside in the backyard.

Here's a canvas I didn't slash. I can't relate to what I was getting at on it so I'll use it for my first two hour project. It's a large canvas: 30" x 32"

I really like getting water from the hose. It should make clean up fast and furious too.

Awesome.

Start Time: 1pm
Deadline: 3pm

Let's go.


Time 1:10 gessoed over my old image


Time: 1:12 checking out my source material for my new painting. Found my charcoal to sketch guides onto the canvas.


Time 1:20 Image is drawn onto the canvas. I'm ready to paint. Must be done by 3:00pm. Yikes.

Time 1:40 Background is in and first shadows applied. I only realized later that I didn't start with my darkest darks. Normally that's what I first place onto my forms but I forgot. I'm rusty.

Time 1:58 More colour added to the figures.


Time 2:00 The Halfway Mark.
I've been painting for an hour. Time to step back and take a look from a distance. I think I can make it but I can't stop. I have to keep going. (I am so relieved I can still paint... yay.)


Time2:05 Have to start dealing with the details and all those gaping maws.

Time 2:15
Stepping back to see if the images make sense, and they do.


Time 2:20 More darks and more shades of red.


Time 2:30 Only 30 minutes left to deadline. Here I am pushing the darks. This is when I realize I didn't do this at the start... hello?

Time 2:50 I changed the background colour completely and continued to add details and darks.


Time 3:00pm.
Time's up.
It's titled TRIO and I've signed it.

After thoughts: I feel I could add some feathery bulk to the guy on the lower right.
I'm wondering how adding a touch of green would work as well as placing some fiery red-orange-just a dab-into the focal points of the two open mouths. Since this is a practice canvas I have time to do it.

I can practically hear those noisy birds.

Good.